
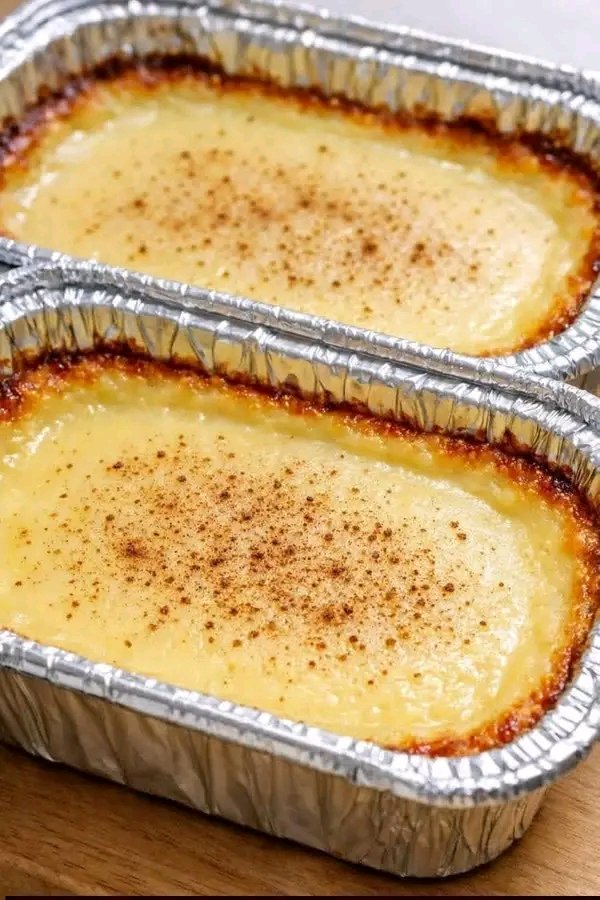
When it comes to dessert, sophistication doesn’t always require a long list of expensive ingredients. This Baked Milk Pudding is a timeless classic that showcases the true magic of minimalist cooking. Turning everyday dairy and pantry staples into a rich, velvety custard, this recipe is a favorite for home cooks looking for a high-reward, low-effort sweet treat.
By slowly baking the liquid mixture, the milk proteins set into a delicate, melt-in-your-mouth texture. The edges caramelize against the heat of the pan, providing a beautiful dark border that perfectly balances the creamy center dusted with warm ground cinnamon.
Table of Contents
- The Science Behind a Perfect Set Custard
- The Minimalist Ingredient Checklist
- Step-by-Step Culinary Instructions
- How to Achieve the Perfect Caramelized Edges
- Flavor Variations: Vanilla, Nutmeg, and Citrus Escapes
- Storage and Serving Recommendations
1. The Science Behind a Perfect Set Custard
The core of this baked milk dessert relies on gentle protein coagulation. When milk and eggs are combined and heated, the proteins slowly unravel and bond together, trapping the liquid inside a delicate matrix. The secret to ensuring your pudding is silky smooth rather than rubbery is controlling your oven heat and baking the mixture just until the center retains a slight, uniform wobble.
2. The Minimalist Ingredient Checklist
To stay true to the simple nature of this classic comfort dessert, we use high-impact pantry essentials:
- Whole Milk (4 Cups): Full-fat milk provides the necessary fat content for a rich, velvety mouthfeel.
- Eggs (4 Large): Acts as the natural structural binder to set the pudding.
- Granulated Sugar (½ Cup): Sweetens the base while helping retain moisture.
- Ground Cinnamon: Dusted generously on top right before baking for a sweet, aromatic warmth.
- (Optional: A splash of vanilla extract or a pinch of cornstarch for an extra firm hold.)
3. Step-by-Step Culinary Instructions
Phase 1: The Liquid Base
Preheat your oven to 170°C (340°F). In a large mixing bowl, vigorously whisk together your eggs and granulated sugar until the mixture becomes pale yellow and slightly frothy. Slowly pour in the whole milk and vanilla extract, whisking continuously until the sugar completely dissolves.
Phase 2: The Strain (Optional but Recommended)
For a flawless, bakery-quality texture, pour the liquid mixture through a fine-mesh sieve into a large measuring cup. This removes any unblended egg strands, ensuring an ultra-smooth consistency.
Phase 3: The Pour and Dust
Pour the mixture into foil loaf pans or a ceramic baking dish. Dust the entire surface generously with ground cinnamon. The spice will float elegantly on the top layer of the milk.
Phase 4: The Bake
Bake for 35–40 minutes. You are looking for the edges to brown and puff up slightly, while the center should still have a small, gelatinous jiggle when the pan is moved.
4. How to Achieve the Perfect Caramelized Edges
To replicate the dark, caramelized borders seen in professional displays:
- Foil Pans vs. Ceramic: Foil loaf pans heat up rapidly, which cooks the outer perimeter of the pudding faster, creating those beautiful, chewy caramelized edges.
- The Broiler Option: If your custard is set but you want a deeper color on top, switch the oven to the broiler setting for the final 60 seconds. Keep a close eye on it, as sugar and cinnamon can burn quickly!
5. Flavor Variations: Vanilla, Nutmeg, and Citrus Escapes
- The Holiday Warmth: Swap the cinnamon for freshly grated nutmeg and a dash of allspice for a festive flavor profile.
- The Citrus Brightness: Infuse the milk with strips of lemon or orange peel before mixing with the eggs to cut through the heavy dairy richness.
- The Caramel Base: Drizzle a layer of warm caramel sauce at the absolute bottom of the pan before pouring the milk mixture for an upside-down custard surprise.
6. Storage and Serving Recommendations
- Serving Temperatures: This pudding can be enjoyed warm straight from the oven, but it settles into a dense, fudge-like custard when chilled in the refrigerator.
- Storage: Cover tightly with plastic wrap and store in the fridge for up to 4 days.
- Freezing: Due to the delicate emulsion of milk and eggs, freezing is not recommended as it will cause the pudding to separate upon thawing.
Final Expert Tip
Always allow your baked milk pudding to sit at room temperature for 10 minutes before diving in. This cooling period lets the internal custard structure finish setting completely, ensuring a clean scoop every single time.
Are you a fan of classic pudding desserts? Drop a “Yum” in the comments if you want the full printable recipe card for your kitchen!